
Best Yoga for Back Pain: 7 Expert-Approved Poses for Lasting Relief
Why This Guide Exists (And Why It’s Different)
Let’s be real—back pain sucks. Whether you’re hunched over a laptop for 8 hours a day, chasing after kids, or just waking up feeling like you’ve aged 20 years overnight, you’ve probably searched “best yoga for back pain” more times than you can count.
Here’s the thing: most articles throw a bunch of poses at you without explaining WHY they work or HOW to actually do them safely. This guide is different. We’ve combined insights from physical therapists, certified yoga instructors, and real people who’ve actually kicked their back pain to the curb. No fluff, no robotic instructions—just practical, science-backed yoga that works.
What's Really Going On With Your Back?
Before we dive into the poses, let’s talk about what’s actually happening. Your back isn’t just “acting up” for no reason. Modern life basically designs us for back pain:
Sitting is the new smoking (okay, maybe not that dramatic, but close)
Stress tightens everything, especially your lower back
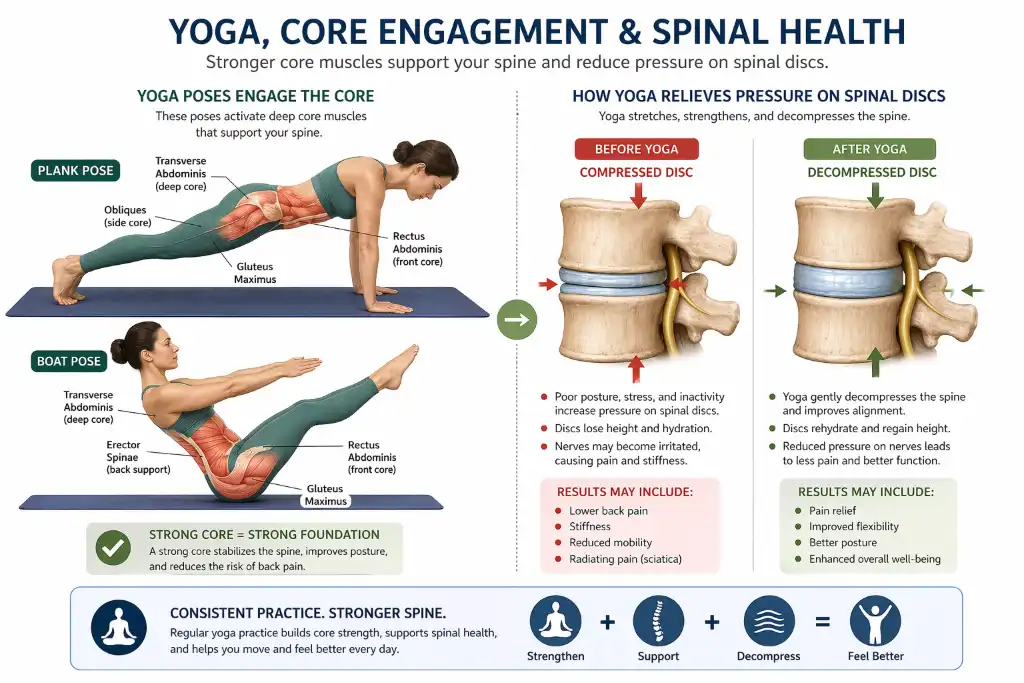
Weak core muscles leave your spine hanging out to dry
Poor sleep positions sabotage your recovery overnight
The good news? Yoga addresses ALL of these issues simultaneously. It’s not just stretching—it’s strengthening, lengthening, and retraining your body to move better.
Best Yoga for Back Pain: The Science-Backed Approach
When we say “best yoga for back pain,” we’re not throwing around buzzwords. Research from the American College of Physicians actually recommends yoga as a first-line treatment for chronic low back pain. Here’s why it works:
The Triple Threat Benefit:
Physical: Improves flexibility, strengthens supporting muscles, increases blood flow
Mental: Reduces stress hormones that amplify pain signals
Behavioral: Teaches body awareness so you catch bad habits before they wreck you
Why Yoga Beats Painkillers (Long-Term)
Look, popping ibuprofen might mask the pain for a few hours, but it doesn’t fix the root cause. Yoga does. A 2023 study found that people who practiced yoga regularly for 12 weeks had:
40% reduction in pain intensity
Better sleep quality
Less reliance on medication
Improved mood and function
And here’s the kicker: the benefits lasted months after they stopped formal practice because they’d learned sustainable habits.
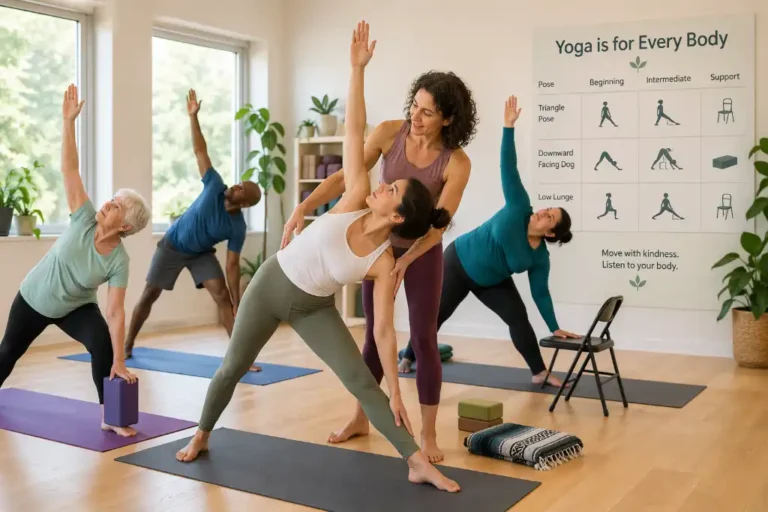
Beginner Yoga Routine for Chronic Back Pain at Home
Starting your yoga journey when you’re in pain feels intimidating. I get it. Your back hurts, you’re not flexible, and the idea of twisting into pretzel shapes sounds like a nightmare. But here’s the secret: the best yoga for back pain isn’t about extreme flexibility. It’s about consistency and listening to your body.
Getting Started Safely
First, the non-negotiables:
Talk to your doctor if you have herniated discs, sciatica, or recent injuries
Invest in a good yoga mat (your knees will thank you)
Start with 10-15 minutes, not hour-long sessions
Pain vs. discomfort: Sharp pain = stop. Gentle stretch = keep going
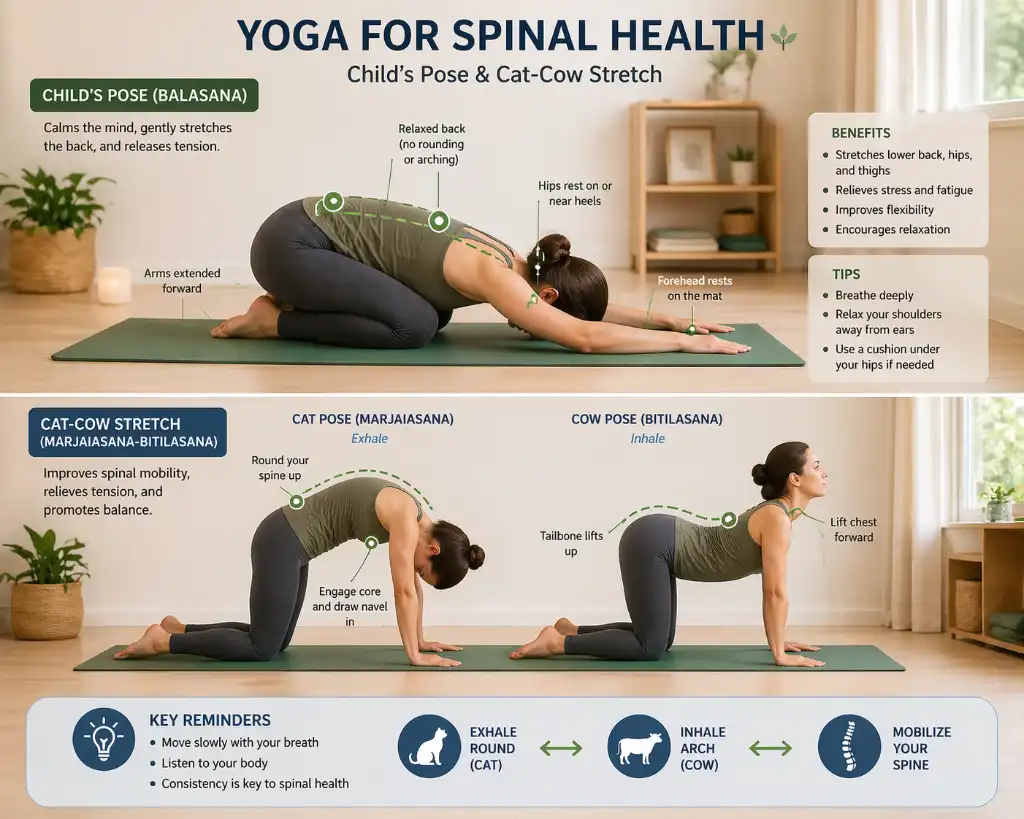
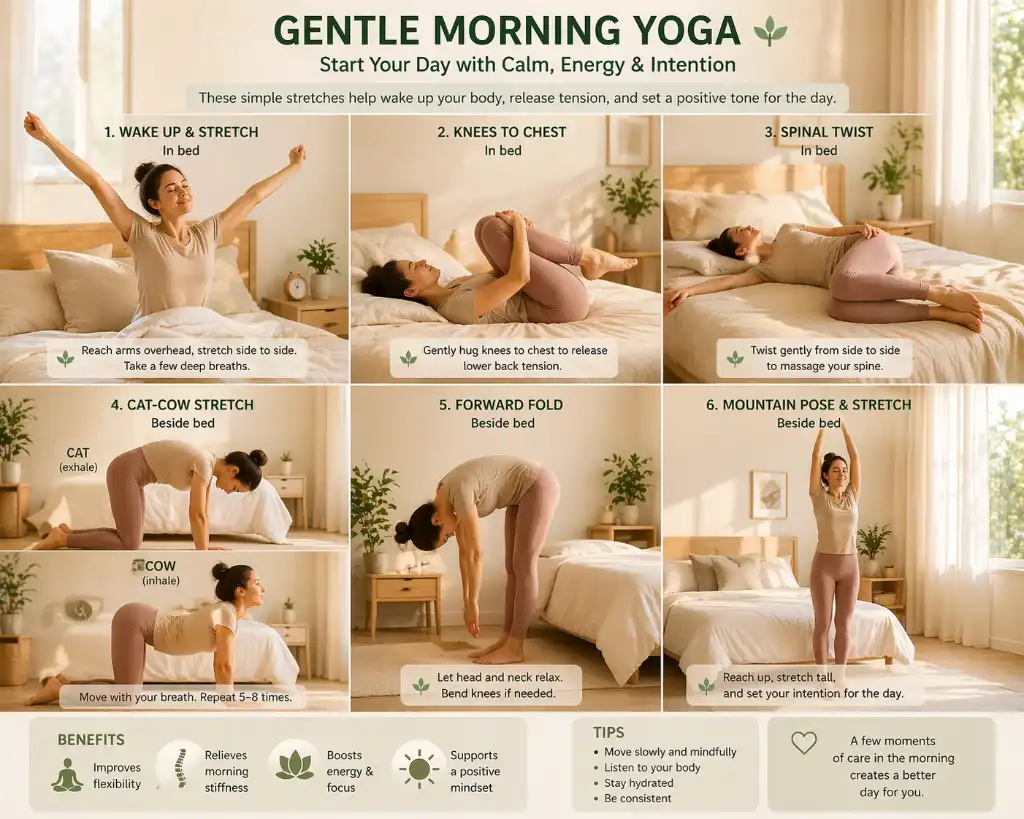
[Image Prompt 3: Person doing child’s pose and cat-cow stretches on a comfortable yoga mat at home, showing proper form with alignment markers]
Essential Poses for Beginners
1. Child’s Pose (Balasana)
This is your safe haven. Knees wide, big toes touching, forehead on the mat. Breathe here for 1-2 minutes whenever your back screams for mercy.
Pro tip: Place a pillow under your chest if reaching the floor hurts.
2. Cat-Cow Stretch
On hands and knees, alternate between arching your back (cow) and rounding it (cat). Move slowly with your breath. This mobilizes your entire spine without strain.
Do this: 10 rounds, morning and night
3. Supine Twist
Lie on your back, hug knees to chest, then let them fall to one side while looking opposite. This releases tension in your lower back and hips.
Hold: 30 seconds each side
4. Legs-Up-The-Wall
Sounds too easy? That’s the point. Lie on your back with legs resting up a wall for 5-10 minutes. This decompresses your spine and reduces swelling.
Perfect for: After long workdaysBuilding Your Daily Practice
Week 1-2: Just Child’s Pose + Cat-Cow (5 minutes total)
Week 3-4: Add Supine Twist (10 minutes)
Week 5+: Full routine including Legs-Up-The-Wall (15-20 minutes)
[Internal Link Suggestion]: Check out our 30-Day Back Pain Relief Challenge for a day-by-day progression plan.
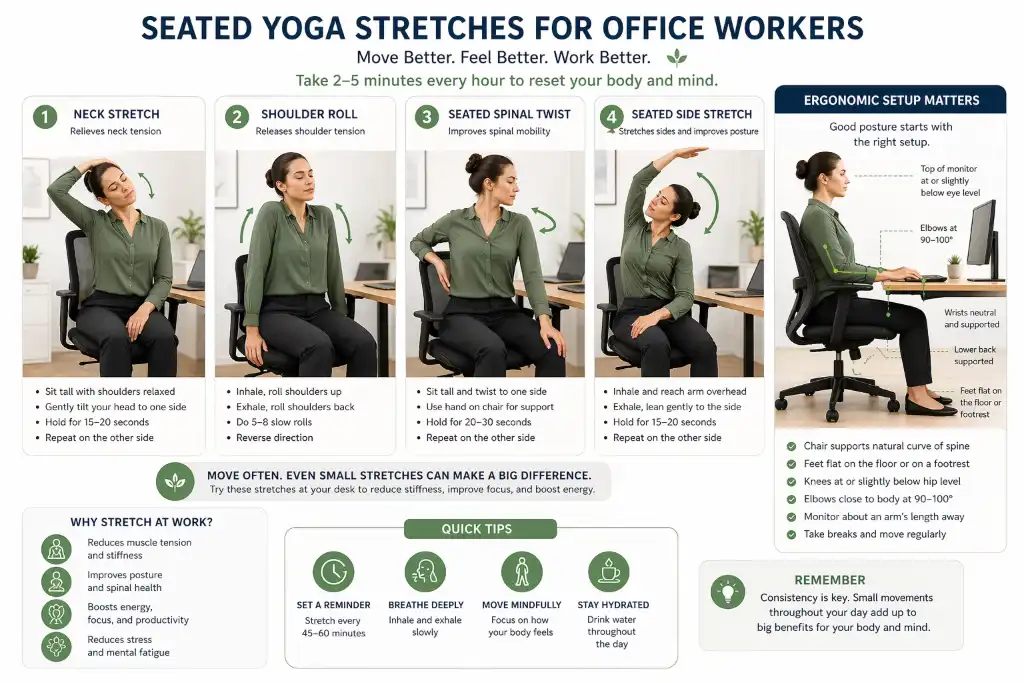
Desk Worker Yoga Exercises for Upper and Lower Back Pain
If you work at a desk, your body is literally designed to hurt by 3 PM. Forward head posture, rounded shoulders, tight hip flexors—it’s a perfect storm for back pain. But you don’t need to quit your job to fix it. You need strategic movement breaks.
The 3 PM Back Pain Crisis
Here’s what happens: You sit for hours. Your hip flexors shorten. Your glutes turn off (it’s called “gluteal amnesia”—yes, that’s real). Your upper back rounds forward. By afternoon, your lower back is compensating for everything else that’s tight.
The solution isn’t one 30-minute yoga session. It’s frequent, targeted movement throughout the day.
Quick Desk Relief (Do These at Your Desk)
1. Seated Cat-Cow
Sit tall, hands on knees. Inhale, arch your back and open your chest. Exhale, round your spine. No mat needed.
Do: 5 rounds every 2 hours
2. Seated Figure-Four Stretch
Cross your right ankle over left knee. Gently press down on right knee while sitting tall. Feel that hip opener? Your lower back just sighed in relief.
Hold: 30 seconds each side
3. Doorway Chest Stretch
Stand in a doorway, forearms on the frame at 90 degrees. Step through gently. This counters all that forward hunching.
Hold: 30 seconds, 3x daily
Midday Reset Routine (10 Minutes in a Conference Room)
Got a lunch break? Use 10 minutes of it for this sequence:
Standing Forward Fold (let your head hang heavy) – 1 minute
Low Lunge (stretch those hip flexors) – 1 minute each side
Thread the Needle (upper back release) – 1 minute each side
Downward Dog (full body decompression) – 2 minutes
Corpse Pose (actual rest, not just scrolling your phone) – 3 minutes
Why this works: You’re hitting every area that gets tight from sitting—hips, chest, upper back, hamstrings.
Preventing Weekend Warrior Syndrome
Here’s a trap: You sit all week, then hit the gym hard on Saturday. Your back hates this. Instead:
Move a little every day (even 5 minutes counts)
Warm up properly before intense exercise
Strengthen your core 2-3x per week
[Internal Link Suggestion]: Want more desk-friendly moves? See our Office Yoga Survival Guide for 20 quick stretches..
Gentle Yoga Stretches for Lower Back Pain Relief
Not all back pain is the same. Sometimes it’s a dull ache. Sometimes it’s sharp and stabbing. Sometimes it’s there when you wake up, sometimes only after activity. Gentle yoga meets you where you are—no “no pain, no gain” nonsense.
Morning Routine: Wake Up Without Wincing
The problem: You’ve been still for 8 hours. Your discs rehydrate overnight (they’re like sponges), making them more vulnerable first thing in the morning.
The fix: Gentle movement before you even get out of bed.
In-Bed Sequence (5 minutes):
Knee-to-Chest: Pull one knee in, hold 10 breaths, switch
Gentle Twist: Let both knees fall to one side, breathe, switch
Ankle-to-Knee: Cross one ankle over opposite knee, gently pull
Then get up slowly and do:
4. Standing Side Bend: Reach one arm overhead, lean gently
5. Pelvic Tilts: Standing or against a wall, practice tilting your pelvis
Evening Wind-Down: Release the Day's Tension
Nighttime is when your nervous system finally relaxes. Use this to your advantage with restorative poses.
The 15-Minute Evening Sequence:
1. Supported Bridge Pose
Lie on your back, knees bent. Place a block or firm pillow under your sacrum (not your lower back). Let your hips rest there for 2-3 minutes. This gently reverses the compression from sitting.
2. Reclined Pigeon
On your back, cross right ankle over left knee. Thread hands behind left thigh, gently pull. This targets the piriformis—a common culprit in lower back pain.
Hold: 2 minutes each side
3. Happy Baby Pose
On your back, grab the outsides of your feet. Knees toward armpits, feet toward ceiling. Rock gently side to side. This releases your entire posterior chain.
Stay: 2-3 minutes
4. Supported Child’s Pose
Place a bolster or stack of pillows lengthwise. Rest your torso on it. This is next-level relaxation.
Breathe: 3-5 minutes
When Pain Flares Up: The Emergency Protocol
- Rest, but don’t bed rest completely (movement aids healing)
- Gentle walking for 5-10 minutes every few hours
- Supported poses only (Child’s Pose with pillows, Legs-Up-The-Wall)
- Avoid: Forward folds, twists, anything that increases pain
- Add Cat-Cow (super gentle)
- Supine stretches (on your back, gravity-assisted)
- Breathing exercises (pain creates tension, tension creates pain—break the cycle)
- Numbness or tingling down your leg
- Loss of bladder/bowel control
- Pain after a fall or injury
- Fever with back pain
Therapeutic Yoga Poses for Sciatica and Back Discomfort
Sciatica isn’t just “bad back pain.” It’s when your sciatic nerve—the longest nerve in your body—gets irritated or compressed. The result? Pain that shoots from your lower back down your leg, sometimes all the way to your foot. It can feel like burning, tingling, or electric shocks.
Standard stretching often makes it worse. You need targeted, therapeutic approaches.Standard stretching often makes it worse. You need targeted, therapeutic approaches.
Understanding Sciatica: It's Not Just Your Back
The Sciatica-Safe Sequence
.
What to Avoid with Sciatica
Not all yoga is created equal. Some poses can make sciatica significantly worse:
❌ Deep forward folds (especially with straight legs)
❌ Full Wheel or deep backbends
❌ Aggressive twists
❌ Prolonged sitting in any pose
❌ Poses that cause numbness or tingling
✅ Instead: Focus on gentle opening, nerve glides, and restorative poses
When to Seek Professional Help
Yoga is powerful, but it’s not magic. See a healthcare provider if:
Pain persists beyond 6 weeks
You have progressive weakness in your leg
Numbness doesn’t improve
Pain wakes you up at night
You’ve tried conservative care with no improvement
A physical therapist or yoga therapist can assess your specific situation and modify poses accordingly.
[Internal Link Suggestion]: Learn more about working with professionals in our Finding the Right Yoga Therapist Guide.
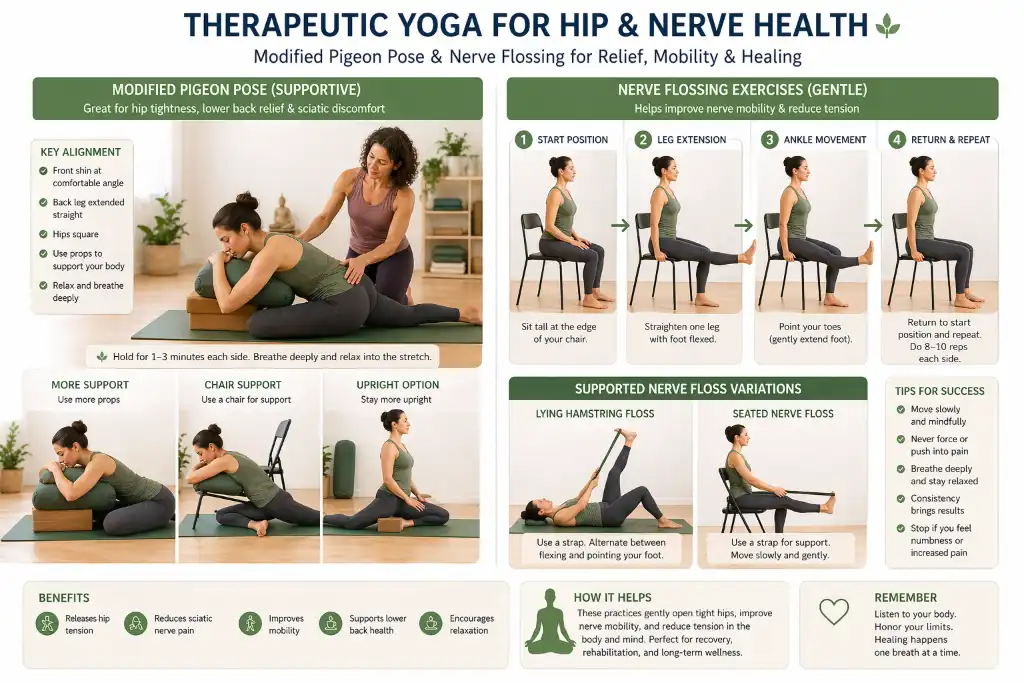
[Image Prompt 6: Therapeutic yoga session showing modified pigeon pose and nerve flossing exercises with props and support, instructor assisting student]
Building Your Sustainable Practice
Here’s the truth nobody tells you: Doing yoga perfectly for one week won’t fix chronic back pain. Doing it imperfectly for three months will.
The Consistency Formula
Start stupidly small. I’m talking 5 minutes a day. Why? Because you’ll actually do it. Once it’s a habit, you can expand.
Week 1-2: 5 minutes daily (just Child’s Pose + Cat-Cow)
Week 3-4: 10 minutes (add one more pose)
Month 2: 15-20 minutes (full sequence)
Month 3+: Mix it up based on how you feel
Tracking Progress (Beyond Pain Levels)
Pain is a lagging indicator. You might not notice it decreasing for weeks. Track these instead:
Sleep quality: Are you waking up less?
Mood: Less irritable?
Function: Can you bend to tie shoes easier?
Stress: Do you feel calmer overall?
These often improve before pain does, which keeps you motivated.
Common Mistakes That Sabotage Progress
Your Next Steps
You now have the tools. The poses, the sequences, the understanding of what works and what doesn’t. But knowledge without action is just trivia.
Here’s your action plan:
✅ Today: Do 5 minutes of Child’s Pose + Cat-Cow
✅ This week: Try one sequence from this guide
✅ This month: Build to 15 minutes, 4-5x per week
✅ Long-term: Make yoga part of your lifestyle, not a quick fix
Remember: The best yoga for back pain isn’t the most advanced practice. It’s the one you actually do consistently.
[Internal Link Suggestion]: Ready to go deeper? Download our Free 30-Day Back Pain Relief Calendar with daily yoga sequences.
Frequently Asked Questions (FAQs)
1. How long does it take for yoga to help back pain?
- Week 1-2: Better sleep, reduced stress
- Week 3-4: Improved mobility, less morning stiffness
- Week 6-8: Noticeable pain reduction
- Week 12+: Significant functional improvement
2. Can yoga make back pain worse?
3. What type of yoga is best for back pain?
- Hatha Yoga: Slow-paced, focuses on alignment—perfect for beginners
- Iyengar Yoga: Uses props extensively, emphasizes precision—excellent for injuries
- Restorative Yoga: Deeply relaxing, supported poses—great for acute pain
- Viniyoga: Adapts poses to individual needs—therapeutic approach
- Yin Yoga: Long holds (3-5 minutes) target connective tissue—good for chronic tightness
- Power Yoga/Ashtanga: Fast-paced, intense—wait until you’re pain-free
- Hot Yoga: Heat can mask pain signals—risky if you can’t feel your limits
- Bikram: Same poses every time—lacks individualization
4. Should I do yoga every day for back pain?
5. Can I do yoga if I have a herniated disc?
- Gentle walking
- Supine (on your back) poses
- Supported poses with props
- Neutral spine positions
- Gentle core strengthening (like dead bugs, not crunches)
- Deep forward folds (especially seated)
- Deep twists
- High-impact movements
- Heavy lifting
- Poses that cause leg pain or numbness
6. Is it better to do yoga in the morning or evening for back pain?
- Reduces morning stiffness
- Sets a calm tone for the day
- Improves posture before you start sitting
- Increases blood flow after being still all night
- Releases tension accumulated during the day
- Improves sleep quality (critical for pain recovery)
- Activates parasympathetic nervous system (rest and digest)
- Gives you time to check in with your body
7. What props do I need for back pain yoga?
- Yoga mat: Non-slip, adequate cushioning (not too thick, not too thin)
- 2 yoga blocks: Foam is softer, cork is firmer—both work
- Yoga strap or belt: Helps you reach without straining
- Bolster or firm pillows: For supported restorative poses
- Blanket: For cushioning knees, supporting neck
- Wall: Free and incredibly useful for alignment
- Chair: For seated modifications or support
8. Can yoga help sciatica permanently?
- Strengthens supporting muscles (reducing future episodes)
- Improves flexibility (less nerve compression)
- Teaches body awareness (catching problems early)
- Reduces inflammation (through stress reduction)
- Creates sustainable movement habits
- Consistency: Practicing regularly, not just during flare-ups
- Addressing root causes: Is it a disc? Piriformis? Poor posture? All of the above?
- Lifestyle changes: Ergonomics, sleep position, stress management
- Overall fitness: Yoga plus walking/strength training is more effective than yoga alone
9. Should I see a doctor before starting yoga for back pain?
- Pain started after an injury or fall
- You have numbness, tingling, or weakness in legs
- Pain is severe or worsening
- You have unexplained weight loss with back pain
- You have fever along with back pain
- You’re over 50 with new-onset back pain
- You have history of cancer, osteoporosis, or steroid use
- Pain wakes you up at night or is constant
- You have mechanical back pain (worse with certain movements, better with others)
- You’ve had similar pain before that resolved
- Pain is mild to moderate
- No neurological symptoms
- You’re generally healthy
10. How do I modify yoga poses for back pain?
- Can’t touch your toes? Go halfway. Or to your shins. Or just hinge at the hips.
- Deep twist hurting? Twist less. Even 10 degrees counts.
- Knees hurt in Child’s Pose? Put a blanket under them.
- Can’t reach the floor? Use blocks under your hands.
- Back needs support? Do poses against a wall.
- Standing forward fold hurting? Do it seated.
- Plank too intense? Do it on your knees.
- Lying on your back uncomfortable? Try side-lying.
- Can’t hold a pose for 1 minute? Hold for 15 seconds. Build up gradually.
- Some poses just don’t work for your body right now. That’s okay. Come back to them later.
- Downward Dog: Bend knees generously, use blocks under hands
- Pigeon Pose: Do it on your back instead (supine figure-four)
- Boat Pose: Keep knees bent, or just lift feet an inch off the ground
11. Can yoga replace physical therapy for back pain?
- Individualized assessment and treatment plan
- Hands-on techniques (manual therapy, dry needling)
- Specific exercises for your exact condition
- Progress tracking and adjustments
- Insurance coverage (often)
- Medical oversight
- Holistic approach (mind, body, breath)
- Stress reduction component
- Community/support (if in classes)
- Long-term sustainability
- Cost-effective (once you learn)
- Empowerment (you control your practice)
- Acute phase: Work with a physical therapist to stabilize and reduce pain
- Recovery phase: Continue PT while adding gentle yoga
- Maintenance phase: Transition to primarily yoga with occasional PT check-ins
12. What should I eat to support back pain recovery with yoga?
- Omega-3s: Fatty fish (salmon, sardines), walnuts, flaxseeds, chia seeds
- Colorful vegetables: Berries, leafy greens, broccoli, bell peppers
- Healthy fats: Olive oil, avocado, nuts
- Spices: Turmeric (with black pepper), ginger, garlic
- Whole grains: Oats, quinoa, brown rice
- Processed foods: Fast food, packaged snacks
- Added sugars: Soda, candy, pastries
- Refined carbs: White bread, white rice
- Excessive alcohol: Increases inflammation
- Processed meats: Bacon, deli meats, sausages
- Before: Light snack 1-2 hours before (banana with almond butter, small smoothie)
- After: Protein + carbs within 2 hours (Greek yogurt with fruit, chicken with sweet potato)
- Vitamin D: Many people are deficient; important for bone health
- Magnesium: Helps muscles relax
- Omega-3: If you don’t eat fish regularly
- Turmeric/Curcumin: Natural anti-inflammatory
13. How do I stay motivated to practice yoga when I’m in pain?
14. Can men do yoga for back pain or is it just for women?
- Ancient yoga masters were predominantly men
- Professional athletes use yoga: LeBron James, Tom Brady, Novak Djokovic
- Military and first responders: Use yoga for injury prevention and recovery
- Men have back pain too (arguably more, due to reluctance to seek help)
- Ego: “I’m strong, I don’t need to stretch”
- Misconception: Thinking yoga is easy or just “stretching”
- Intimidation: Walking into a studio full of flexible women
- Lack of representation: Fewer male yoga teachers in mainstream media
- Yoga is HARD: Try holding Plank for 2 minutes or balancing in Warrior III
- Strength + flexibility: You need both for a resilient back
- Breathwork improves performance: In the gym, on the field, in life
- Injury prevention: Yoga addresses imbalances that cause injuries
- Look for men’s yoga classes (growing in popularity)
- Try online classes if studio feels intimidating
- Focus on function, not flexibility: “I’m doing this to lift without pain”
- Find male teachers: Jesse Enkamp, Tim Senesi, Patrick Beach
15. What’s the difference between yoga for back pain and regular yoga?
- Poses chosen specifically for your condition
- Emphasis on proper alignment over depth
- Modifications offered as standard, not exception
- Pace is slower, more mindful
- Teachers explain WHY each pose helps
- You learn about your anatomy
- Emphasis on body awareness and listening to signals
- Teaches you to self-modify
- Avoids poses that commonly aggravate back pain
- Uses props extensively
- Encourages questions and communication
- Never pushes through pain
- Includes breathing techniques for pain management
- Addresses stress (a major pain amplifier)
- May include meditation or relaxation
- Considers lifestyle factors
- Move quickly through sequences
- Emphasize “advanced” poses
- Assume a baseline level of fitness/flexibility
- Not offer many modifications
- Push you to go deeper/faster
- Active pain/recovery: Seek out therapeutic yoga, yoga therapy, or classes specifically labeled “gentle,” “restorative,” or “for back pain”
- Pain-free maintenance: You can gradually transition to regular classes, but always inform the teacher about your history
- Hybrid approach: Do therapeutic yoga 2-3x per week, regular yoga 1-2x per week for variety
- Teacher says “no pain, no gain”
- No modifications offered
- Teacher doesn’t ask about injuries
- You feel pressured to keep up
- Sharp pain is dismissed